Before Canadians enter the US card market, many of us rightfully ask, “How do I pay off my US credit card?” It’s a valid question. One option is Norbert’s Gambit, but the more convenient option is using a currency conversion service like Wise.
While Wise offers better rates than the Big Five banks, there are still a few fees you must pay unless you’re a savvy consumer. Truth be told, a commenter on Episode 12 of Miles Ahead gave us the lowdown on how to save on these fees, and we found it so useful that we created this resource so you can learn how to avoid fees when converting Canadian dollars to US dollars!
What Fees Exist When Converting Currency With Wise?
Wise charges a direct deposit fee of a few dollars when you send money from a Canadian financial institution into your CAD Wise account. The money is available instantly, but you need to wait a few days between transfers for your bank account to “clear” the money, which can be annoying.
You can send money via eTransfer or debit card for a much higher fee if you need to send more money quickly, but it’s quite a high price compared to the direct deposit option.

Wise also charges a fee to get your newly minted USD to your bank account, but the good news is that both of these fees can be avoided!

How to Avoid Fees When Converting CAD to USD
Reduce Fees with EQ Bank
As outlined earlier, direct depositing money from your primary bank account to Wise costs a small fee and has some time limitations. The easiest way to turn your CAD into USD is to open an EQ Bank account. EQ Bank integrates Wise directly into their online banking portal, meaning you won’t be subject to those pesky direct deposit fees.
The steps for setting up an EQ Bank account are simple and are outlined below. The best part about EQ Bank is that there are no account fees or minimums!
Start out by clicking on “Create an Account” after navigating to eqbank.ca.

You’ll then need to give all of the usual personal information and confirm a Canadian phone number. Note that my Google Fi and NumberBarn ported Canadian number did not work, so you may have the best luck with one of the main Canadian mobile carriers.

To verify your identity and as standard Know Your Customer (KYC) protocols, you’ll be asked for your SIN, employment info, address, and date of birth.


Lastly, you will create a password and agree to the terms and conditions. After that, you’re officially an EQ Bank customer!

The easiest way to deposit money into your EQ Bank account is through eTransfer. It’ll go through instantly, and then you can initiate an International Transfer. I prefer doing this on mobile as I find it easier to navigate.
As an aside, you can also create an external linkage to Canadian bank accounts through EQ Bank. It is simple to transfer once it is set up, but it may result in a longer waiting period for your cash to settle versus using eTransfer.
If you have an existing Wise account, you’ll link it with EQ Bank, and you’ll see that all your usual recipients are available to select. Usually instantly, or sometimes in 24 hours, you’ll see the USD in your US-based bank account! This way, you’ll have successfully avoided the Canadian direct deposit fee!
You’ll see below that there are still some fees in the quote, and compared to a direct conversion in the Wise App (done within minutes of each other), EQ is charging more by a couple of dollars.


Those couple of dollars are made up for in the direct deposit fee going from Wise to your USD bank account. EQ Bank is charging about an 80-cent premium for its integration, which, all things considered, is pretty small and represents a 0.1% fee, which could be considered a rounding error.
There is a way to avoid all fees, but it’s a bit more complex, and the cost savings are minimal. However, to be thorough, I will detail it.
Save on All Fees with Wealthsimple
If you want to avoid that extra 80-cent surcharge, you can make an external transfer from select banks that allow this. Most legacy banks in Canada have eliminated external transfers and only offer wire transfers or eTransfers.
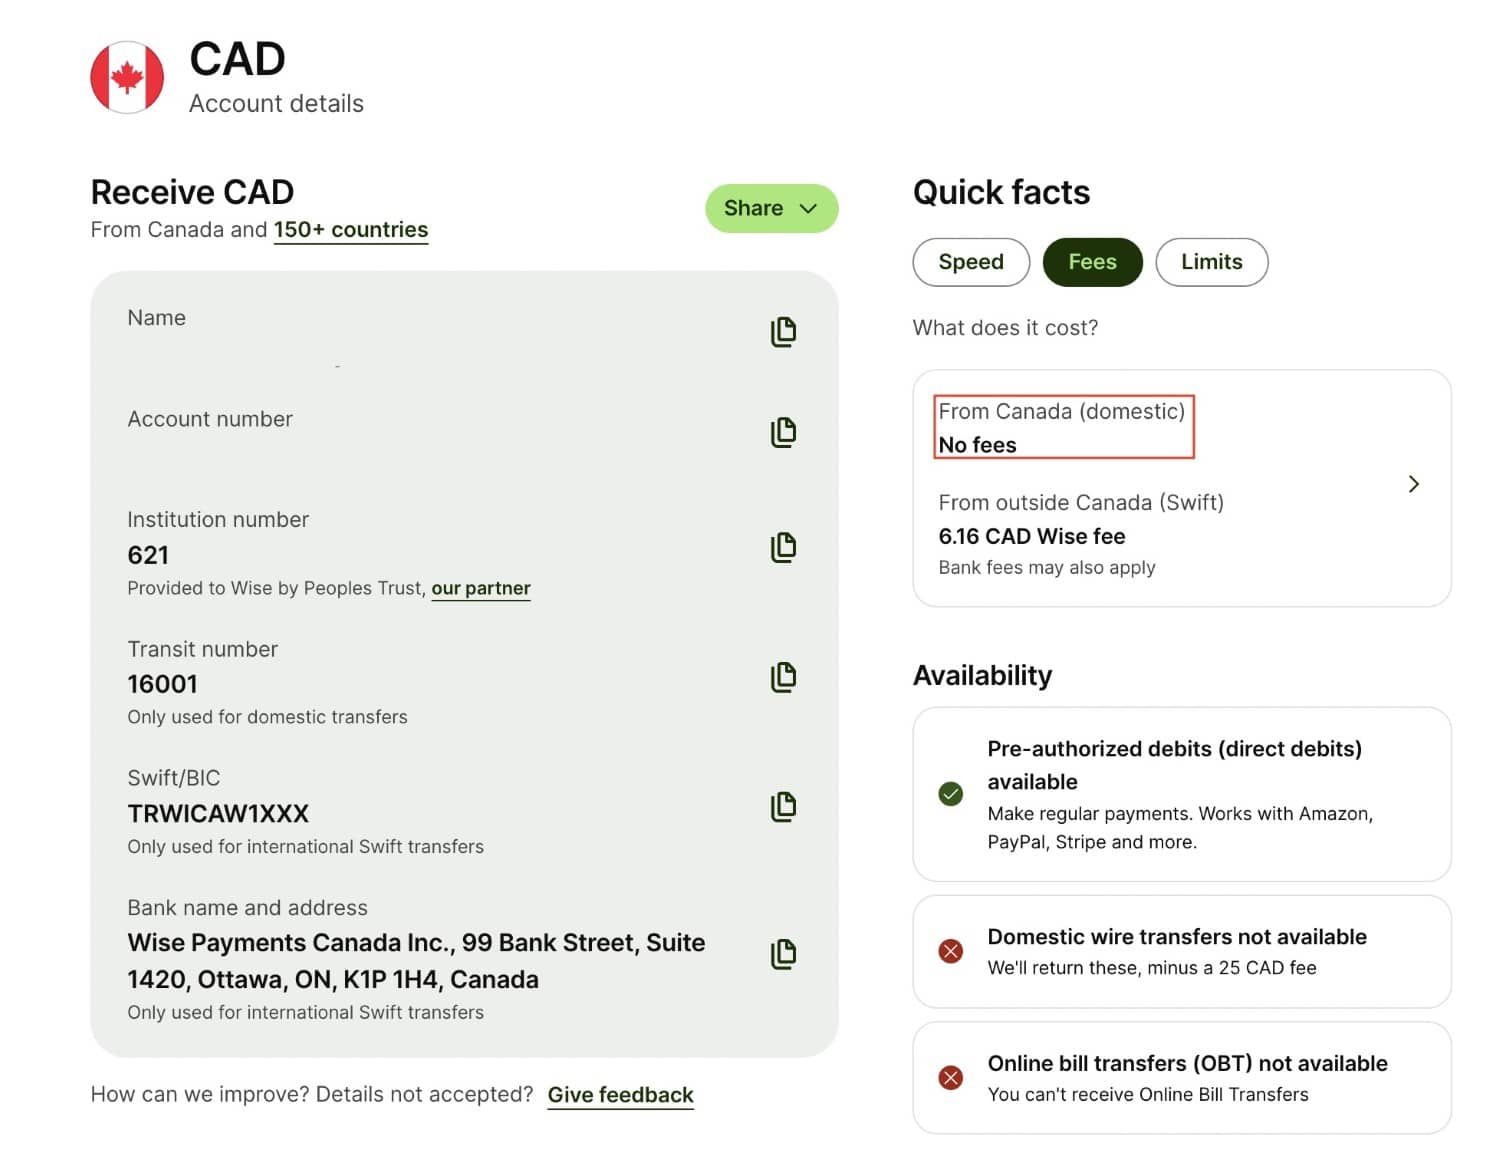
Wealthsimple offers a fairly easy way to do this, but it requires some extra verification. As you can see in the “Receive CAD” section of Wise, receiving money with an external transfer is free.
First, you’ll need to open a Wealthsimple Cash account and add money. You can add money from a connected bank account or eTransfer when logged into your Wealthsimple account.


Once your money is added, you’ll click on “Move Money”.

Then you’ll select “Link a new account”, click “Search for another institution”, and search for Peoples Trust Company.


To successfully link the accounts, you must head back to Wise and grab your transit and account numbers and enter them.

Wealthsimple will ask for proof of ownership documents at the next screen. What worked for me was providing a statement from Wise and checking off the “Stamp and sign this document” box.


Then, Wise will appear immediately in your Wealthsimple account, and you can initiate a free transfer to your Wise account.

Save on Fees from Wise to USD
To avoid paying the few dollars in fees to Wise or EQ Bank, you can get your Wise Bank USD account and initiate transfers from your legacy US-based bank account.
You’ll first need to verify yourself to access your USD account details. You can do this by logging into your account on your desktop and clicking on the USD currency tab.

You’ll be brought to the following page, where you’ll need to click through the prompts again to continue the verification process.

If you’ve taken advantage of our ITIN service or have an SSN or ITIN due to working in the US, you can enter it now; otherwise, you’ll need to go through some extra rigamarole.

Wise is extensive in their Know Your Customer (KYC) process and will again ask you if you’re not a US citizen and don’t have an ITIN or SSN.

To verify your identity, all you need to do is provide a bank statement, which you should have, as it’s a required step for getting a US credit card in the first place.

Your bank statement must match what you have on file with Wise, which, again, should merely be a formality. After clicking continue, you’ll be asked to upload the document and be brought to a confirmation screen.


After 2 minutes, I received a confirmation email that my account was verified and I was ready to go!

After that’s complete, you can head back to your Wise account to see your account details (again, my account number has been censored here). Most importantly, you’ll see that ACH transfers are listed as free!

Starting with Chase, you’ll take the account and routing number from your Wise account and input them into the external transfer page.

Chase will then send trial deposits, which take anywhere from 36-48 hours to show up. I set up both my Chase and CIBC accounts as external transfers. The process takes a few days with test deposits, but it is worth it in the long run.

Wise sends email alerts when money is deposited into your account, making it easy to track. You’ll log back into your Chase account and then input the cents on the external transfer screen.
CIBC followed a similar process under the “Transfer” tab on the desktop.

After you’ve verified your account by confirming the test deposits, you can initiate a transfer into your Wise account from your US-domiciled bank account.
How to Avoid Fees When Converting USD to CAD
If you end up with a surplus of USD thanks to some Amex Offers, or earn in USD like 50% of my household does, transferring USD into your Wise account is no different than requesting an external transfer like we just did, except you’ll reverse the direction starting with your USD account.

Of course, you then initiate an external transfer from your Wealthsimple account as well to finalize the process, avoiding all fees except for the small conversion fee that Wise charges.
Conclusion
Getting US credit cards as a Canadian is the ultimate endgame for some, as it opens many redemption paths that are simply unavailable with Canadian financial institutions. If you only earn in CAD, using these tactics to save on converting your dollars to USD will help you maximize the value available south of the border.

Daniel Burkett
Latest posts by Daniel Burkett (see all)
- Review: JW Marriott Orlando Bonnet Creek Resort & Spa - Jun 17, 2026
- Wyndham Rewards Experiences: What You Need To Know - Jun 1, 2026
- Review: River Terrace Inn Napa - May 27, 2026
- Hilton Timeshare Offers: What To Expect & Are They Worth It? - May 8, 2026
- Review: JW Marriott Crete Resort & Spa - Apr 29, 2026
Adding Wise to Wealthsimple as an external account is now way simpler. I have a Wise account. I went to Wealthsimple and clicked “Transfer Money”. I selected Wise from the list. Wealthsimple had me log into my Wise account and after doing that, I selected my Wise Canadian dollar account to connect with my Wealthsimple cash account. Was done immediately and I sent myself a tranfer from Wealthsimple to Wise. Easy!
Any thoughts on using TD global transfer from CAD to USD account? I was going to do this to pay off my credit card, but don’t see a way to set up bill payments from my TD complete checking USD account. Is this not a valid option? Thank you
Hey Sam,
I don’t have any experience with TD’s conversion service, but if the exchange rate is reasonable and you find it convenient, go for it! You should be able to add your TD bank account to your Amex account and pay your card that way.
Thank you Daniel! I ended up setting up an EQ bank account and using Wise as the exchange rate was much better and the process was straightforward. Thanks for the tip!
May I suggest an alternative which avoids all steps outlined above? Let’s assume you don’t want to pay more than WISE rates when buying USD and transferring it to a bank in USA. You need to pay US bills so you need money in a USA bank. Here’s how I do it.
Advantages:
You will do your Foreign Exchange as a customer of RBC Direct Investing, NOT the bank. Fees are equivalent to WISE.
All transactions (cross-border transfers and foreign exchange conversions) are instant if performed during banking hours
All transactions are completed by one financial institution
Requirements:
RBC chequing account (fees depend on various factors)
RBC Cross-Border Banking package with a checking account in RBC Bank (Georgia) Inc included ($39/yr)
RBC USD$ bank account in Canada ($3/mo)
RBC Direct Investing Account with USD$ Margin Account included, CAD$ Margin account included ($25/quarter inactivity if you buy no stock, sell no stock, waived if auto-deposit $100/mo)
Process:
Login to RBC Online banking
Go to Direct Investing tab
Transfer Funds from Chequing to CAD$ Margin acct
Transfer Funds from CAD$ Margin acct to USD$ Margin acct
Transfer Funds from USD$ Margin acct to USD$ Chequing acct
Go to Banking tab
Choose “Transfer money Cross-Border”
Use drop-down to Transfer money from USD$ Chequing account to RBC Bank Checking acct. There will be no fee and no exchange. Money moves across the border 1:1.
Looks like a lot in this list but it’s a 3-minute process and there is NO WAITING and NO Third Party. Money lands in a proper Bank in USA, with Bill Pay privileges, access to ACH transfers.
WISE is excellent for many things but it’s a third party and using all the steps in this article you’re handing money from one thrid-party to another, which is fine if you’re willing to wait and you’re confident nothing will go wrong. Or you’re confident the right party will admit fault when something does.
My process, above, which I wish I could copyright, has served me well, with dozens of transactions per month, for a decade, without a single hiccup. I hope this is helpful.